Using Fides in ParaView
Fides is now available as a reader in ParaView. We’ll explain here how to build ParaView with the Fides reader, as well as show examples of post-hoc, in transit, and in situ visualization of your ADIOS data using Fides and ParaView.
ADIOS2 Build
To run the examples on this page, you’ll need to have ADIOS built with the following options. Feel free to add any other ADIOS options desired.
$ mkdir adios2-build && cd adios2-build
$ cmake -DADIOS2_BUILD_EXAMPLES=ON -DADIOS2_USE_CATALYST=ON -Dcatalyst_DIR=<path to catalyst> -DCMAKE_INSTALL_PREFIX=<install path> -DADIOS2_USE_MPI=ON ../adios2
$ ninja && ninja install
This builds ADIOS with the examples that contains the gray-scott simulation we will be running, along with a plugin that enables inline in situ visualization with ParaView Catalyst. This uses Catalyst v2, so it is only necessary to point ADIOS to your build of the Catalyst Stub library, not a ParaView build. If in situ visualization is not needed, the Catalyst options can be left out.
ParaView Binaries
To enable Fides support in ParaView, you can either build from source or download the binaries for your system. Fides has been available as a reader in ParaView since v5.9, however we recommend using v5.12 or later, since it has many updates and fixes for reading BP5 files and using Fides with ParaView Catalyst.
Note
If you want to do in situ visualization, you will most likely need to build ParaView manually, so it can be built with the same ADIOS on your system. Otherwise you may experience weird crashes. If you only want post hoc or in transit visualization, downloading the appropriate ParaView binary for your system should be fine.
Manually Building ParaView with the Fides Reader
If you’re used to building ParaView, the instructions don’t change much for building Fides. Full ParaView build instructions are outside the scope of this guide, but can be found in the ParaView repo.
To get the Fides reader in ParaView, you’ll need to add the CMake option -DPARAVIEW_ENABLE_FIDES=ON.
Fides is included as a third party module, so you do not need to build your own version of Fides to use in ParaView.
A couple of notes:
ADIOS2 is required and you may need to set the environment variable
ADIOS2_ROOTif CMake cannot detect the location of your ADIOS2 build. You do NOT need to set the option-DPARAVIEW_ENABLE_ADIOS2=ON. This turns on other ADIOS2 readers. There’s no problem to enable both sets of readers, but the examples here uses only the Fides reader and-DPARAVIEW_ENABLE_FIDES=ONis sufficient to run these examples.For MPI support in ParaView, you can set the CMake option
-DPARAVIEW_USE_MPI. The Fides reader can be used with or without MPI. We recommend turning it on for following some of the examples here.For our examples in this guide, we will be showing how to use the Fides reader with ParaView’s Python scripting support, so you should also build with Python support. Use the CMake option
-DPARAVIEW_USE_PYTHON=ON.If you want to follow the in situ visualization example, you’ll also need to turn on the option
-DPARAVIEW_ENABLE_CATALYST=ON.
Gray-Scott Example
The Gray-Scott example is located in the ADIOS2 repo.
Go to the <install prefix>/share/adios2/gray-scott directory. Assuming ADIOS was installed at /opt/adios2, you should see something like:
$ cd <install prefix>/share/adios2/gray-scott
$ ls
ReadMe.md                catalyst                 gsplot.py                settings-inline.json     visit-bp4.session.gui
adios2-inline-plugin.xml cleanup.sh               pdfplot.py               settings-staging.json    visit-sst.session
adios2.xml               decomp.py                settings-files.json      visit-bp4.session        visit-sst.session.gui
Run Gray-Scott
To run, you can do the following:
$ mpirun -np 4 ../../../bin/adios2_simulations_gray-scott settings-files.json
You should now see gs.bp in your current directory.
The number of steps for Gray-Scott is set to 1000. If you’d like to change this number, change the value for steps in settings-staging.json.
You can do a bpls to see what’s in the file:
$ bpls gs.bp -a
double   Du                           attr
double   Dv                           attr
double   F                            attr
string   Fides_Data_Model             attr
string   Fides_Dimension_Variable     attr
double   Fides_Origin                 attr
double   Fides_Spacing                attr
string   Fides_Variable_Associations  attr
string   Fides_Variable_List          attr
double   U                            100*{64, 64, 64}
double   V                            100*{64, 64, 64}
double   dt                           attr
double   k                            attr
double   noise                        attr
int32_t  step                         100*scalar
string   vtk.xml                      attr
We see that in addition to the attributes and variables written by the simulation, we also output some metadata into ADIOS attributes that Fides can use to generate the data model (see Data Model Generation).
Interactive Post-hoc Visualization
Start ParaView. There are two ways to open files with the Fides reader. Either opening a JSON file that contains a Fides data model, or opening a BP file that contains attributes used for generating the data model.
Opening BP file directly:
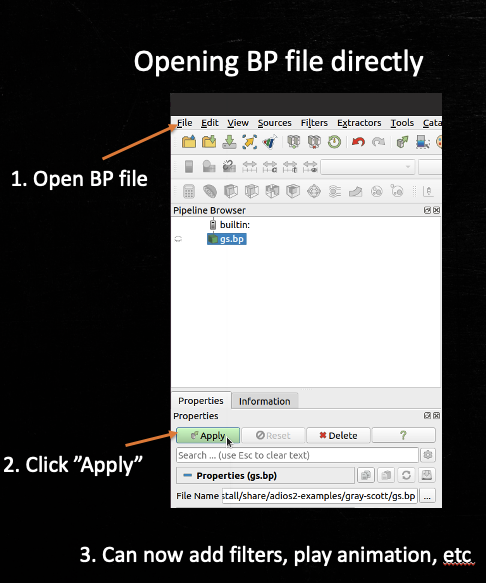
Adding attributes for generating the data model looks like the following for gray-scott (screenshot from gray-scott/simulation/writer.cpp):
// add attributes for Fides
io.DefineAttribute<std::string>("Fides_Data_Model", "uniform");
double origin[3] = {0.0, 0.0, 0.0};
io.DefineAttribute<double>("Fides_Origin", &origin[0], 3);
double spacing[3] = {0.1, 0.1, 0.1};
io.DefineAttribute<double>("Fides_Spacing", &spacing[0], 3);
io.DefineAttribute<std::string>("Fides_Dimension_Variable", "U");

std::vector<std::string> varList = {"U", "V"};
std::vector<std::string> assocList = {"points", "points"};
io.DefineAttribute<std::string>("Fides_Variable_List", varList.data(), varList.size());
io.DefineAttribute<std::string>("Fides_Variable_Associations", assocList.data(),
                                assocList.size());
If we look at the values of the attributes using bpls, you should get the following (only Fides-specific attributes shown here):
$ bpls gs.bp -Ad
string   Fides_Data_Model             attr   = "uniform"
string   Fides_Dimension_Variable     attr   = "U"
double   Fides_Origin                 attr   = {0, 0, 0}
double   Fides_Spacing                attr   = {0.1, 0.1, 0.1}
string   Fides_Variable_Associations  attr   = {"points", "points"}
string   Fides_Variable_List          attr   = {"U", "V"}
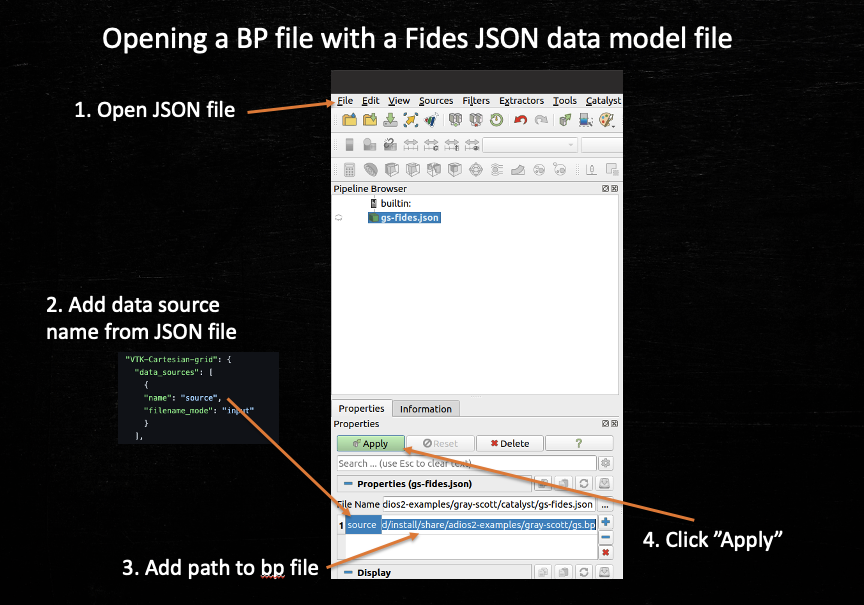
If you want to open a JSON file containing a Fides data model, you can do the following:
Post-hoc Batch Visualization
The ADIOS2 gray-scott repo contains a gs-pipeline.py script that can be used for any of the batch processing examples, whether you’re doing post-hoc, in transit, or in situ.
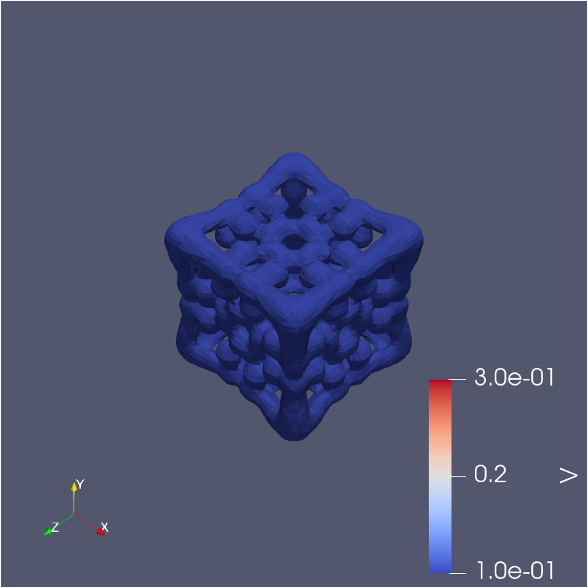
This script will perform a contour for each time step in the gs.bp file.
First let’s run it and see the output, then we’ll break down what’s going on in the script.
To run (assuming we are still in the share/adios2/gray-scott directory):
$ mpirun -np 2 /path/to/paraview-build/bin/pvbatch catalyst/gs-pipeline.py -b gs.bp -j gs.bp
There’s a few command line args needed by gs-pipeline.py:
-bis the path to the BP file.-jis the path to the JSON file.
There should be one png file per timestep located in our directory. One of the time steps is shown below:
In transit Batch Visualization
In transit visualization can be done with the Sustainable Staging Transport (SST) engine. With SST, data is staged in the writer ranks’ memory. Readers can join late or leave early without affecting the simulation, depending on your SST settings. SST can queue steps that have not yet been consumed. Typically you’ll set up SST to run so that it will discard steps if its queue is full and no one has read it. This means your analysis script may not visualize every time step if the time to complete the analysis is longer than the computation time in your simulation step. It is possible to set the SST engine to block instead of discarding time steps, but this can slow down your simulation.
If you ran the earlier example and have a bunch of output*.png files in your directory, you can run the clean up script to remove them:
$ ./cleanup.sh data
Now edit the adios2.xml file to use the SST engine instead of BP5.
<io name="SimulationOutput">
    <engine type="SST">
        <!-- SST engine parameters -->
        <parameter key="RendezvousReaderCount" value="0"/>
        <parameter key="QueueLimit" value="1"/>
        <parameter key="QueueFullPolicy" value="Discard"/>
        <parameter key="DataTransport" value="MPI"/>
        <!-- BP5/SST engine parameters -->
        <parameter key="OpenTimeoutSecs" value="60.0"/>
        <!-- BP5 engine parameters -->
        <parameter key="NumAggregators" value="1"/>
        <parameter key="AsyncWrite" value="false"/>
        <!-- BP5 reader parameter -->
        <!--parameter key="SelectSteps" value="0:n:10"/-->
    </engine>
</io>
The parameter RendezvousReaderCount determines if a reader must connect before the writer will start. Setting to 0 means the writer will just get started without a reader connected. It may be useful to set this value to 1 in some cases. For instance, if you have a static mesh that’s only defined in the first step. In the case of gray-scott it’s not necessary because the mesh is a uniform grid, so nothing is explicitly defined (i.e., we have the info we need to create the mesh at every time step).
The parameter QueueLimit determines the number of steps that will be queued while waiting on a consumer.
QueueFullPolicy can be set to Discard or Block.
Now to set up our example to run with SST for in transit visualization, we’ll open two terminals. Make sure both are changed to the <install prefix>/share/adios2/gray-scott directory.
In terminal 1, run:
$ mpirun -np 4 ../../../bin/adios2_simulations_gray-scott settings-staging.json
Depending on your SST parameter settings, the simulation will either start running, or stop on the first step to wait on a reader to connect. In terminal 2, run:
$ mpirun -np 2 <paraview install>/bin/pvbatch catalyst/gs-pipeline.py -j catalyst/gs-fides.json -b gs.bp --staging
This is similar to the command to run for post-hoc batch visualization, but adds a --staging flag. This is so the script can tell Fides that the SST engine is going to be used.
The output will also be similar to the post-hoc batch example, except that you may be missing images for time steps, depending on your SST settings.
In Situ Batch Visualization
Fides has also been integrated into ParaView Catalyst. ParaView provides an engine plugin for ADIOS that simplifies using the Inline engine and uses Catalyst. This requires using ADIOS v2.8.0 or later, due to the use of an ADIOS plugin, though we recommend using the most recent version (currently v2.9.2). Internally, this plugin uses the ADIOS inline engine to pass data pointers to ParaView’s Fides reader and uses ParaView Catalyst to process a user python script that contains a ParaView pipeline. Normally, using Catalyst would require directly instrumenting your simulation with the Catalyst API calls, but with ADIOS you get this built in.
In this example we’ll use the settings-inline.json which uses the adios2-inline-plugin.xml configuration file.
This XML file shows how to use an engine plugin with ADIOS.
It sets the engine type to plugin and provides the PluginName and PluginLibrary parameters required when using ADIOS engine plugins.
In addition, you will need to set the environment variable ADIOS2_PLUGIN_PATH to contain the path to the libParaViewADIOSInSituEngine.so shared library built by ParaView.
The gs-pipeline.py script that we used in the previous examples also has Catalyst specific code so that it can be used for Catalyst as well.
Note
Currently you must provide the JSON file with the data model. Support for generating the data model from ADIOS Attributes will be added in the future.
The lib directory of your ADIOS install should contain libParaViewADIOSInSituEngine.so.
Set the following environment variables:
$ export ADIOS2_PLUGIN_PATH=/path/to/adios/build/lib
$ export CATALYST_IMPLEMENTATION_NAME=paraview
$ export CATALYST_IMPLEMENTATION_PATHS=/path/to/paraview-build/lib/catalyst
The two Catalyst environment variables will ensure that the ParaView Catalyst implementation of the Catalyst API is used at runtime. If this isn’t set, the stub library will be used. Your simulation will still run, but the pipeline will not be performed.
We’ll clean up any output files again:
$ ./cleanup.sh data
Now, to run:
$ mpirun -n 4 ../../../bin/adios2_simulations_gray-scott simulation/settings-inline.json
You’ll see your output files, with one for each step. Since this is inline in situ visualization (i.e., the data is being analyzed while still in memory), the simulation will pause while the pipeline is being ran, before going on to the next step.